Functional Design Specification
How the program should behave in practice for the user. Page 2 of 4
< < previous page < <
> > Next page > >
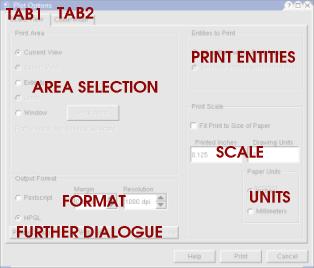
Fig 1.9 Print dialogue box, tab 1
The option to print is only available when a drawing has been loaded. When a drawing is not loaded the option is greyed out. A shortcut key, Crtl-P, also activates the dialogue box, as will the commands 'print' or 'plot' from the internal command line. Two tabed pages are visable in the dialogue box.
The first tab, labelled Scale/View, controls the Print area, Entites to print, output format and Print scale. Other options are to produce a print preview, batch control file or to enter the printer setup.
The print area options allow the user to select from a number of ways of defining the area to be printed. These include the current view, saved view, extents, limits and window. Only one of these 5 options may be selected at once. Selecting the window option enables the pick area button nearby. Selecting the pick area button closes the print dialogue box and gives the user a windowing tool to select an area. Once selected the print dialogue box re-appears with the plot window information filled in with the co-ordinates that the user selected with the windowing tool.
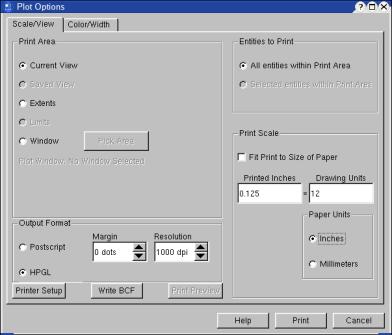
Fig 2.0 Print dialogue box, tab 1
The output format options allow the user to choose either postscript or HPGL output methods as well as setting the margin in dots and the resolution in dots per inch. Only one of the options may be selected at once. The minimum margin is 0 dots while the maximum margin is 600 dots. Minimum resolution is 1 dot per inch whilst the maximum is 1000 dots per inch.
The Entities to print options allows selection of either All entities within print area or Selected entities within the print area. Only one of the options may be selected at once. The first option should print all the selected entities within the print area whilst the second should only print thoose selected in the same area.
The print scale option are in the lower left corner. These include a check box to select to fit the print to the size of the paper. When checked this greys out and disables the alternative options. Deselecting it reenables the alternatives. These are to enter the printed size in mm or inches compared the number of drawing units. A toggle box allows the choosing between mm or inches as the units.
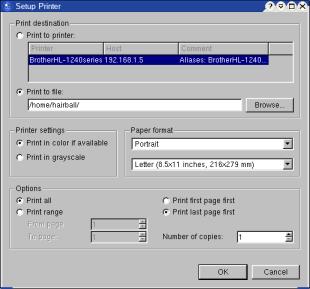
Fig 2.1 Printer setup
Selecting the printer setup button opens the printer setup dialogue box. Sections to the dialgue box are print destination, printer settings, options and paper format. Print destination allows you to choose between printing to a file or printing to a printer, but not both at once. The printer choice shows currently available system printers. The print to file option allows a destination directory and file to be typed into a text box, or a browse button can be selected which opens a dialogue to select a directory by browsing the filesystem. Printer settings allows to toggle between grayscale or colour output. Only one option may be selected at once. Paper format has two drop down option selection boxes. The first allows selection of portrait or landscape, the second shows all currently supported paper sizes that can be selected loaded from the host system - is this true? The last options section allows the user to toggle between printing all or priting a range of the pages from the drawing (if fit to page has not been selected on the previous dialogue). To the right of this is the option to print either the first page first or the last page first, only one option can be selected at once. The number of copies defaults to zero but can be edited as an editable text box or raised/lowered with graphical arrors that can be selected. Buttons ok and cancel are available, the ok button should remember all settings, the cancel button discard.
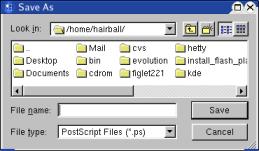
Fig 2.2 Print to file dialogue
The browse button on the print to file option opens up a save as dialogue box, with the file tye set to Postscript. unless HPGL output has been selected? This is a simplified version of the normal save as dialogue box. The main viewpane shows a graphical representation of files and directories in the directory currently being browsed. Above this a horizontal text bar shows name of the directory being browsed and is editable by the user. To the right of this are selectable icons to browse up a level in the directory tree and to create a new directory if the user has write permissions in the currently selected directory. If the user does not have write permissions, this option icon should be greyed out and unselectable.
To the right of the previous two icons are the two icons for the options which affect the viewing mode for the viewpane below. These include a simple listing of files with little information shown other than filenames and a detail view mode which shows information similar to the GNU ls -l command including file size and attributes.
Along the bottom of the box a file name text box is automatcally filled when a file is selected in the viewpane, (having been blank to begin with) and allows editing of the filename to be saved by the user. Options next to this are for performing the save and canceling.
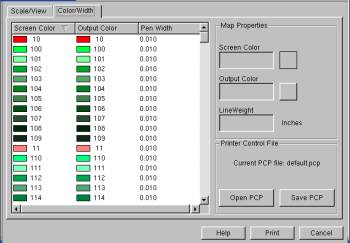
Fig 2.4 Print options second tab
The second tab pane in the print options controls the colours and widths of the different line types in the drawing. The viewpane to the left lists each unique screen colour with its correspoding printable line width and print colour. Selecting an entery in the viewpane enables an edit set of commands to the right. These show the line weight and ouput colour of the selected entery in ediatble text boxes. The Screen colour is also shown in a non-editable box. selecting multiple enteries in the viewpane allows them all to be edited at once. Where their line weights and colours vary in the selection the entery to the right reads "varies" as the value. To the lower right, there are options to save the setings as a Printer Control File or to open an existing file. These buttons open standard versions of the save and open dialogue boxes, with the file mask set to PCP file extensions. This needs to be checked for case insensitivity
